
Let's create a charming two-color crochet flower! This project is perfect for adding a pop of color and handmade charm to almost anything—from hats and bags to headbands and blankets, or even as a standalone embellishment. Using two colors adds depth and visual interest, making the petals stand out beautifully.
.jpg)
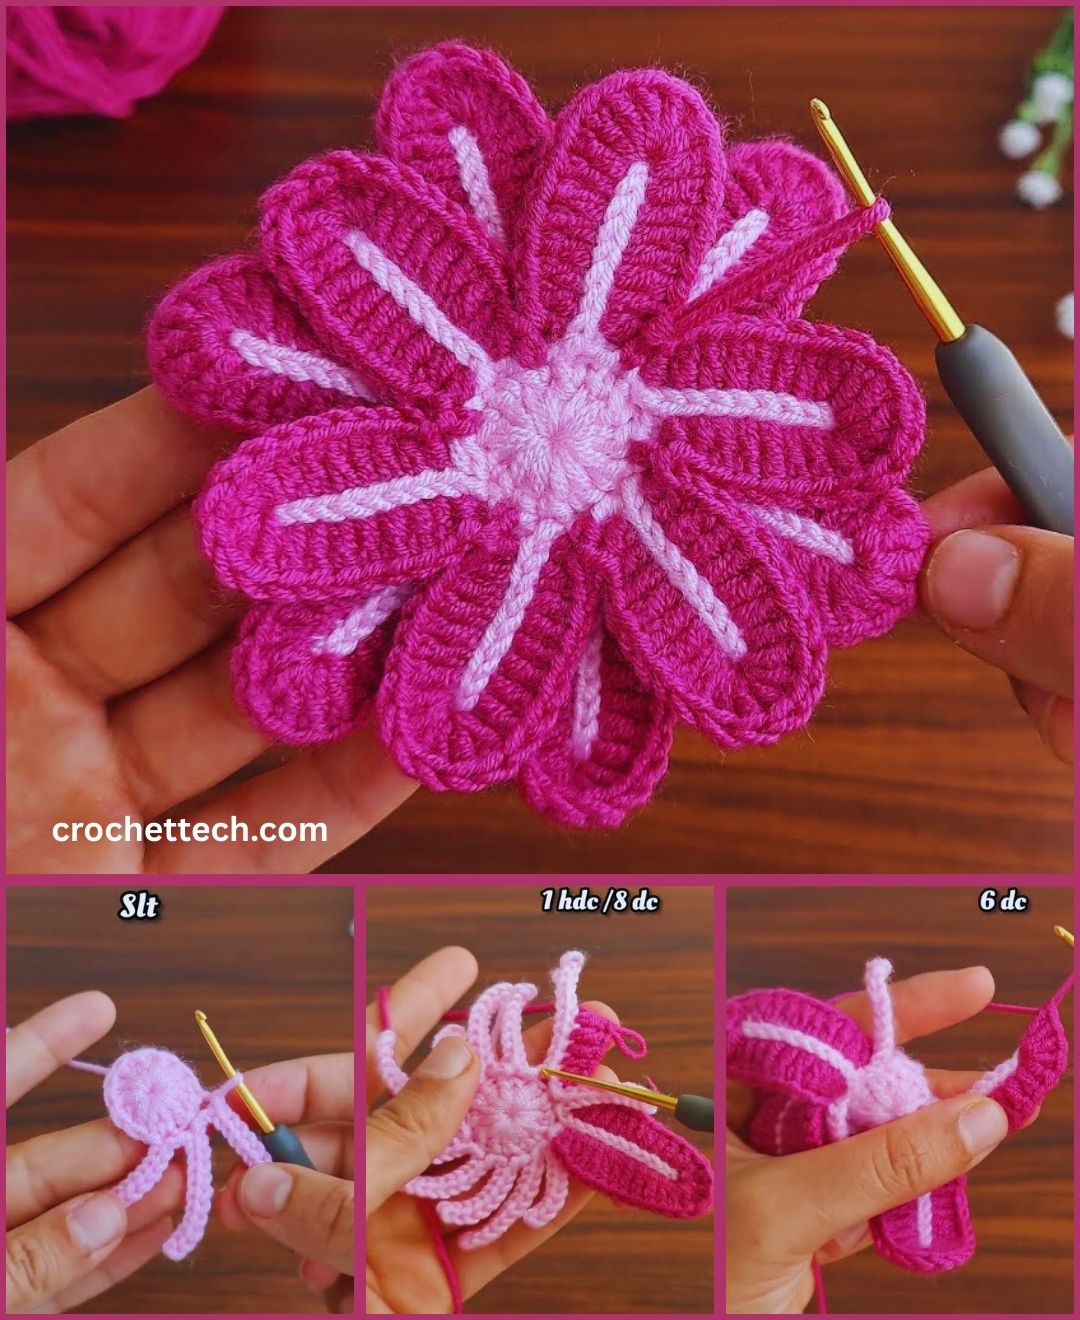
How to Make a Two-Color Crochet Flower
This detailed guide will walk you through crocheting a lovely multi-layered flower using two different yarn colors. We'll focus on creating a distinct center and contrasting petals to achieve a beautiful, dimensional effect.
Skill Level: Beginner-Intermediate
This project is suitable if you're comfortable with (or ready to learn!):
Chain (ch): The basic foundation.
Slip Stitch (sl st): For joining rounds and neatening.
Single Crochet (sc): A dense stitch for the flower's center.
Half Double Crochet (hdc): A good intermediate stitch for petals.
Double Crochet (dc): A common stitch for taller petals.
Treble Crochet (tr) / Triple Crochet: A taller stitch for more dramatic petals (optional).
Magic Ring (MR): An adjustable ring for a neat, hole-free center (alternative start provided).
Working in rounds: Crocheting in a circular manner.
Working into chain spaces: Placing your hook accurately.
Changing colors: Essential for this two-color design.
Weaving in ends securely.
Finished Flower Dimensions (Approximate):
Using worsted weight yarn and the suggested hook, your finished two-color flower will typically measure approximately 2.5 to 4 inches (6.5 to 10 cm) in diameter, depending on how many petals and layers you make.
Materials You'll Need:
Gathering your materials before you begin makes for a smoother crocheting experience.
Yarn: Small amounts of Worsted Weight (Medium #4) Yarn in two contrasting or complementary colors.
Color A (Center): Approximately 5-10 yards (4.5-9 meters). This will be for the inner part of your flower.
Color B (Petals): Approximately 10-20 yards (9-18 meters). This will be your main petal color.
Why Worsted Weight? It's a versatile choice that creates a nice size flower without being too fiddly for beginners. Cotton or acrylic yarn will work well.
Crochet Hook: Size H/5.0mm. This hook size is a versatile choice for worsted weight yarn, creating a fabric that holds its shape well.
Yarn Needle (Tapestry Needle): Absolutely essential for seamlessly weaving in all your loose yarn tails from the color changes. It has a blunt tip and a large eye, making it easy to thread yarn.
Scissors: Any pair of sharp scissors for cutting your yarn.
Stitch Marker (Optional): Helpful for marking the beginning of your rounds, especially if you're new to working in the round.
.jpg)
Understanding the Two-Color Flower Construction: Layer by Layer Bloom
This flower is built in distinct, concentric layers, allowing the two colors to stand out beautifully. You'll be changing colors at a key point to achieve this effect.
Inner Center (Color A): The very core of the flower.
Petal Foundation (Color A): Creating the base for your first set of petals, still in Color A, often forming small chain spaces.
First Petal Layer (Color B): Working directly into the foundation created by Color A, forming your first set of petals in the new color.
Optional Second Petal Layer (Color B): For a fuller flower, you can add a second layer of petals, typically by working into stitches or spaces behind the first layer.
Let's Crochet Your Beautiful Two-Color Flower!
Follow these detailed steps carefully. Pay attention to where you insert your hook and when to change colors. Take your time, and enjoy watching your flower come to life!
Part 1: The Inner Center & Petal Foundation (Color A)
This forms the core of your flower and the base for your first set of petals.
Start with a Magic Ring (MR):
With Color A, create a Magic Ring (MR). This is an adjustable loop that allows you to pull the center tight for a neat, hole-free start.
How to make a Magic Ring: Loop the yarn around your fingers (usually pointer and middle) to form a ring, leaving a tail. Insert your hook into the center of this ring, yarn over, pull up a loop. Then, chain 1. Now you're ready to work stitches into the ring.
Alternative Start (if MR is tricky): If the Magic Ring is too challenging right now, you can chain 4, then slip stitch (sl st) into the first chain to form a ring. You'll then work your stitches into the center of this small chain ring.
Round 1 (Center):
Chain 1 (this chain does NOT count as a stitch; it just gives height for the first single crochet).
Work 8 single crochet (sc) stitches into the Magic Ring (or into the center of your chain ring).
To join the round, slip stitch (sl st) into the first single crochet stitch you made (not the chain 1).
[Total: 8 sc]
If you used a Magic Ring, gently pull the tail of the Magic Ring tightly to close the center hole.
Round 2 (Petal Foundation - creating chain spaces):
Chain 2 (this chain does NOT count as a stitch; it gives height).
Work 1 half double crochet (hdc) into the same stitch where you joined.
Chain 2.
Skip 1 stitch. Work 1 hdc into the next stitch.
Chain 2.
Repeat this pattern: *Skip 1 stitch, work 1 hdc into the next stitch, chain 2* around the entire round.
You should end with a chain 2 after your last hdc.
To join the round, slip stitch (sl st) into the top of the very first hdc you made (not the chain 2).
[Total: 4 hdc stitches and 4 ch-2 spaces]
Do NOT fasten off Color A yet! We will use it again later if you want to add a second layer of petals, but first we'll introduce Color B for the main petals.
Part 2: First Petal Layer (Color B)
Now for your vibrant petals! We'll work directly into the chain-2 spaces created by Color A.
Join Color B:
Pick up Color B.
Insert your hook into any of the chain-2 spaces from Round 2.
Yarn over with Color B and pull through the space, then pull through the loop on your hook to make a slip stitch (sl st). This joins your new color.
Round 3 (Petals):
In the same chain-2 space where you joined Color B:
Work the following sequence all into this same chain-2 space:
1 single crochet (sc)
1 half double crochet (hdc)
1 double crochet (dc)
1 half double crochet (hdc)
1 single crochet (sc)
This sequence creates your first full petal! Gently tug on it to see its shape.
Now, you'll repeat this entire petal sequence into each subsequent chain-2 space around the round:
*In the next chain-2 space: Work (1 sc, 1 hdc, 1 dc, 1 hdc, 1 sc) all into the same chain-2 space.*
Repeat from * to * around the entire round. You will create a total of 4 beautiful petals.
After you've completed the last petal, slip stitch (sl st) into the first single crochet stitch of the very first petal you made to join the round and secure all your petals.
[Total: 4 petals]
Fasten off Color B. Cut your yarn, leaving a tail about 6-8 inches (15-20 cm) long for weaving in.
Optional for Larger/Pointier Petals in this layer: If you want more dramatic petals, you can use taller stitches within the petal sequence, for example:
(1 sc, 1 hdc, 1 dc, 1 treble crochet (tr), 1 dc, 1 hdc, 1 sc) all into the same chain-2 space. (To make a treble crochet (tr): Yarn over twice, insert hook into space, yarn over, pull up a loop [4 loops on hook], *yarn over, pull through 2 loops* twice.) This would create a larger, more pointed petal.
Part 3: Second Petal Layer (Optional - Color A or Color B)
This step adds extra fullness and dimension to your flower. You can use Color A again to create an inner layer that peeks through, or stick with Color B for a solid, fuller look.
Locate stitches for Second Layer:
Gently push the petals of Round 3 forward. Look behind these petals, specifically at the skipped single crochet stitches from Round 1. These are the stitches where you worked an hdc into, then skipped the next sc. You'll be working into these skipped stitches or the hdc posts from Round 2. A common method is to work into the hdc posts from Round 2 or directly into the skipped single crochets from Round 1. Let's aim for the hdc posts as they are easier to locate.
Join Yarn (Color A or B):
If using Color A again, pick it up (it should still be attached from Part 1, Round 2). If not, join it with a sl st to the back loop of one of the hdc stitches from Round 2.
If using Color B for this layer, join it with a sl st to the back loop of one of the hdc stitches from Round 2.
Round 4 (Second Petals):
Chain 2 (does not count as stitch).
In the same hdc stitch (or its back loop/post) where you joined/re-joined: Work (1 dc, 1 tr, 1 dc) all into the same hdc stitch/post.
Chain 2.
Slip stitch (sl st) into the next hdc stitch (or its back loop/post) from Round 2.
Repeat this pattern: *Chain 2. Work (1 dc, 1 tr, 1 dc) all into the same hdc stitch/post. Chain 2. Sl st into the next hdc stitch/post from Round 2* around the entire round.
You will create 4 more petals that sit behind and slightly below the first layer.
After the last sl st, fasten off your yarn, leaving a long tail for weaving in.
Note on Stitch Placement: This can be the trickiest part. You want your new petals to emerge from behind the first layer. Experiment with inserting your hook into the post of the hdc from Round 2, or just into the very base of those stitches from Round 2 where you originally worked your hdc. The goal is to create new petals that layer nicely.
Part 4: Finishing Touches
These final steps are crucial for making your flower look polished and professional.
Weave in ALL Remaining Ends:
This is critical for a clean, durable flower, especially with the color changes. You'll have several tails from your starting Magic Ring, each color change, and your final fasten-off.
Use your yarn needle to meticulously weave in every single loose yarn tail.
How to Weave Neatly: Thread the yarn tail onto your yarn needle. Weave the tail into the stitches of the same color as the tail. This makes it blend in seamlessly. Weave in one direction for at least 1.5-2 inches (4-5 cm). To truly secure it, subtly change direction (e.g., weave along a row, then turn and weave back through some of the same stitches diagonally or perpendicularly) to "lock" the tail in place and prevent it from unraveling. Trim any excess yarn close to the fabric, being careful not to cut any of your actual stitches.
Blocking (Optional but Recommended):
Blocking is the process of wetting or steaming your crochet item and then shaping it and pinning it into place while it dries. For a 3D flower, it can really help the petals lay nicely, open up, even out any tension inconsistencies, and make your flower look more polished.
Method (Wet Blocking - Ideal for Cotton/Acrylic):
Gently mist your flower evenly with cool water using a spray bottle until it's damp but not soaking wet.
Carefully lay your flower flat on a clean, dry surface, a blocking mat (if you have one), or even a thick towel.
Gently open and arrange each of the petals outwards, shaping them nicely. You can gently tug on them or smooth them into your desired shape.
Allow the flower to air dry completely and thoroughly. This can take several hours to a full day, depending on humidity and ventilation. Ensure it's bone dry before handling or using it further.
Congratulations! You've successfully crocheted a beautiful two-color flower! This charming handmade bloom, with its lovely layered appearance and vibrant colors, is now ready to add a touch of personality and handmade beauty to any project or item.
What creative project are you excited to use your new two-color flower on?
.jpg)
.jpg)
.jpg)
.jpg)
.jpg)
No comments:
Post a Comment